Local by Flywheel Upgrade Filesize = Wow!

A while back I came across a post about using Local by Flywheel for local WordPress development, so I decided to try it out.

That was a while ago and I didn’t have the time to fully check it out. So today I decided to go back to it to see if it was any good.

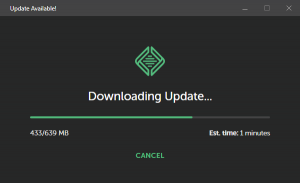
Upon launching the app I was greeted with a window saying an upgrade was available. To my amazement it was 639 MB in size!

Local by Flywheel

I can’t remember the last time an app was even close to that file size. I think it’s been a few years!

P.S. I case you’re wondering if I kept using it or liked it, the answer is no.

Extending a Navigation Menu in Partials in Laravel 5

This post is more of a reminder to myself on how to extend a menu in an included partial when using the PHP framework Laravel.

As of this writing I’m using Laravel 5.1.16.

Hopefully other people find it useful too.

Let’s say you have a similar folder setup to this in your project:

resources/views/
  -- layouts
    -- default.blade.php
  -- partials
    -- nav.blade.php
  index.blade.php

The default.blade.php template includes the navigation partial:

<!DOCTYPE html>
<html lang="en">
<head>
    ...
</head>
<body>
    @include('partials/nav')

    <div>
        @yield('content')
    </div>

</body>
</html>

In order to be able to extend the navigation menu from within index.blade.php you need to add @yield(‘nav’) to the nav.blade.php file.

<ul>
    <li><a href="{{ url('/') }}">Home</a></li>
    @yield('nav')
</ul>

Then from within the index.blade.php file you can extend the navigation menu using the following code:

@extends('layouts/default')
@section('nav')
    <li><a href="#">New Nav item</a></li>
@append {{-- @stop also works --}}

I’m not 100% sure this is the best way to do it, but I searched for a way to use @parent within the nav.blade.php file and could not find a solution.

Leave a comment if you know of a better way to achieve this.

Windows 7 + VirtualBox 4.3.16 + Laravel 4.3

So, I’ve been trying to play around with Laravel 4.3 (which some people are saying is essentially version 5) which suggests you install Vagrant and VirtualBox. But it’s turning out to be a real PITA!!!!

I installed the latest version of both Vagrant (v 1.6.5) and VirtulBox (v 4.3.16). Then I tried setting up Homestead in Laravel. Once I had it setup (or so I thought) I tried running ‘vagrant up’ in my terminal and it got stuck at the ‘Booting VM’ line. It just hangs there, no matter how long I left it (up to 15 mins at one point).

So I launch the VirtualBox (VB) GUI to see if there’s anything there that might help me. I click the Homestead box and try Settings but I get an error that another process is trying to lock it (or something to that effect). I exit VB, but when I start up Windows Task Manager I notice that VirtualBox.exe is listed several times and I can’t seem to ‘End Task’ them (similar situation to this post). After a quick Google search it is suggested that I uninstall VB and reinstall, so I try uninstalling it. But because of the few VirtualBox.exe’s still running in the background the uninstall hangs for ages. I figure the best thing to do is reboot my PC. During the shut down process it tells me that the uninstall process is stopping my computer from shutting down, so I go ahead and tell it to ‘Force Restart’. That doesn’t go well! It got to the Shutting Down screen and just hung. I eventually had to hold down my power button to shut the PC down.

After it restarted I uninstalled and reinstalled VB and tried ‘vagrant up’ again. Still no joy. This time around though I figured out that pressing CTRL+C twice in the terminal after vagrant hangs at the Booting VM line shuts the vagrant process down (although I’m not 100% sure what that does). Going back into the VB GUI still gives the lock error but this time I figured out that instead of trying to End Task VirtualBox.exe there is another process called VBOXSVC.exe which you can shut down and then restart VB and the box settings option works. When you open the box settings it’s like a diagnostic is ran automatically to check all the settings are ok. It suggested that the RAM for the Homestead box was too high  (2GB of the 4GB I had available). I tried reducing it to 1GB and then started the box again but it just hung again.

At this point I figured there must be some setting in the Homestead box that doesn’t play well with my PC, so I try adding the hashicorp/precise32 box suggested in the Vagrant docs. Still no luck. Still hangs at the Booting VM line in the terminal. Time for some more Google searches.

From what I can gather from the Google searches I might be better off trying VB v 4.3.12. I’m about to install it now. Let’s see how that turns out! Updates to follow.

Update 1: Using VirtualBox v 4.3.12 starts the hashicorp/precise32 box just fine, except it is asking me for a login that I have no idea should be.

Update 2: I removed the hashicorp/precise32 box and the laravel/Homestead box (using the VB GUI) and re-added the Homestead box (using Vagrant) and the terminal messages seemed to suggest that everything went ok (although I got 3 remote connection errrors). When I visited laravel5.app:8000 (which I set in my Homestead.yaml file) in my browser it worked! Low and behold!!! So it turns out that VB v4.3.16 was the problem all along.
WordPress + TwinHelix ‘IEPNGFIX’

If you are having trouble getting the IE PNG FIX from TwinHelix to work in your WordPress theme, make sure that you set the correct path to the .htc file in your themes stylesheet.

/* To fix IE 6 or less PNG issues */
img, div, span { behavior: url(wp-content/themes/your_theme_name/iepngfix.htc) }

If the relative path doesn’t work for you, try an absolute path instead.

/* To fix IE 6 or less PNG issues */
img, div, span { behavior: url(http://www.yourdomain.com/wp-content/themes/your_theme_name/iepngfix.htc) }

You also need to set the correct path to the image file in the .htc file.

if (typeof blankImg == 'undefined') var blankImg = 'wp-content/themes/your_theme_name/images/blank.gif';

Again, if the relative path doesn’t work, try the absolute path.

Once you have both paths set correctly everything should work fine. If you’re still having problems, chances are that the paths are still incorrect. Double check them and try again.

It took me a while to figure this out, so I hope this post saves you the bother.

CodeIgniter Profiler: Globally Enable/Disable

Here is a quick tip for users of the CodeIgniter PHP Framework (and a reminder to myself). If you wish to enable or disable the profiler globally while developing your application (as opposed to changing the value in each seperate controller), you can do the following.

1. Open the config.php file in the application/config/ folder.
2. Add a new config setting using the following code:

/*
|---------------------------------
| Globally Enable/Disable Profiler
|---------------------------------
|
| TRUE  = On
| FALSE = Off
|
*/
$config['profiler_status'] = TRUE;

3. Then in each of the controllers that you want to the profiler to be displayed on, add the following code to the constructor.

$this->output->enable_profiler($this->config->item('profiler_status'));

Note: If you prefer to only have the profiler be displayed on some methods, then place the code from step 3 above into each of the methods.

Hope  this helps :)